Saturday 2 August 2014

A Year On ...

Beacon Archers Club Championships
Sherjit, Lee, Maria, Dean
Well a year on and I've won the ladies' championships at Beacon Archers. My score was 715 for the 60/50/40 yards (and it was raining), so I was well pleased with that and we have another competition coming up at the end of August, hopefully I can beat my score. 

I have made a change in my technique though - lining up the string with my bow (which is what you are supposed to do).  This has resulted in me having to adjust my sight as I am now shooting quite far right. I've made this change so that I am more accurate at the longer distances. Hopefully I will get to practise a bit before the competition. Before, I was just making sure my bow was vertical and then just shooting but I really felt that I needed to progress in order to improve my accuracy, time will tell. I was more of an instinctive shooter but now my little motto is "under the chin, line the string' quick and easy to remember. I hope I can still shoot as fast as I have been.

This morning I am going to experiment with my sight. At the moment, in order to reach 70, I have to aim above the target. I'm hoping that by turning my sight upside down I might actually be able to aim properly. I missed out on a Quantum Archery competition last weekend because I didn't think it was worth entering, but there is nothing worse than watching other people shoot without taking part, so for the next one I'm hoping I can reach the target with my sight upside down. I mentioned not being able to sight on the target to a very nice coach from the University of Warwick who said that I needed to work on my bow arm - what's all that about! But, I will take the advice anyway :)

Sunday 29 June 2014

Garden Archery Update

Sorry it's been some time, but at last I have pictures of the garden archery range that my partner and I made.

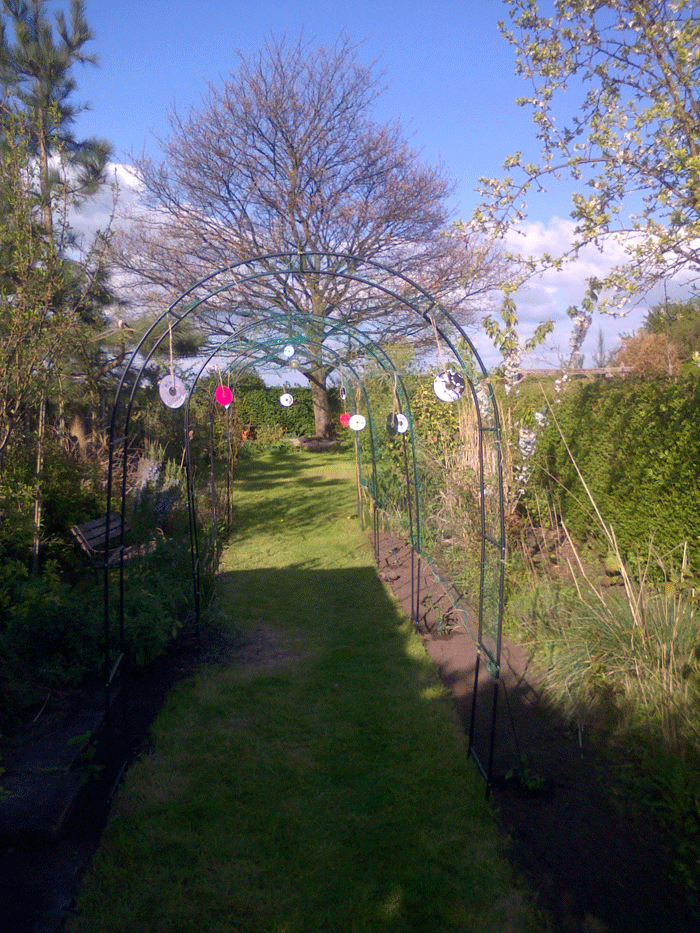
After digging away the grass, putting up the garden arches and netting, I planted lots of climbing plants like clematis, ivy and willow in the new borders. The netting was tied to the trellis (a two-person job) and I hung some old cd's along the tops so that the birds could see the net and not fly into it. I left the bottom clear so that any birds, hedgehogs or other wildlife could still wander round safely and also so that I could still weed the beds while the plants grow up.

It looks longer than it is, I might extend it at a later date. But for now it's mainly for practising my form and fine tuning.

The second image shows the actual set up. It's about 12 yards in length. An old washing line post and metal pole were dug into the ground to hold up an old archery net and I bought the boss second hand for £10.00 from a fellow archer at my club. The arches cost around £6.00 each off e-bay.

At the moment Stratford Archery are selling large foam bosses and stands for £10.00 if anyone is interested. I think they have 18 left. It's on their Facebook page.
Stratford Archery Centre

The third picture is a view from the top of my garden to the house, to show that I have left plenty of room behind the target too. Safety is really important and although I am not worried about the length, I was worried about the width of the garden. At this distance it is not likely that I would miss the target, but for any stray 'bouncers' the net is added protection.

So, fellow archers this is a neat idea to transform your garden, without spending a fortune and I hope it looks great in a couple of year's time when the plants have grown up. I hope you like it.
From top of the garden to house


Friday 25 April 2014

Garden Archery Range

Home Made Archery Range
The garden archery range is slowly happening. My partner and I have been busy over the Easter weekend. Some of the arches are up, some netting added and borders dug. I was a bit worried about the birds flying into the netting so I've hung up some cd's until the plants get going and left a gap at the bottom so that the blackbirds can still run around. I've planted lots of clematis for a more permanent structure, the morning glory seeds are planted and waiting to grow in the greenhouse and I've got some willow to put in. It actually looks much longer in this picture than it really is. The finished range is only going to be about 10 yards so that I can improve my grouping and work on my technique but I'm looking forward to trying it out and maybe at a later date I might extend it. I'll also be shooting down at the target and placing a back net behind it. Our garden slopes upward and backs onto a field (plus we have that huge sycamore tree), so I am not too worried about the length. However, the width is not ideal so I'm taking no chances and planting loads of climbers to make a natural barrier over the netting. I just hope it grows quick!

For now, I'll be happy shooting at a shorter distance and hopefully I won't annoy my neighbours too much. I'm looking forward to the Summer.

Saturday 5 April 2014

Garden Archery Range Coming Soon ...

This should be interesting. I've ordered 6 garden arches off Amazon @ £5.47 each and 4 packs of pea netting for £4.46, totalling £37.28. I'm also planning to buy some Morning Glory seeds as I believe these are fast growing (up to 15 ft in one season). This should cover the arches so I'll have a safe place to shoot in the garden. I'm hoping to get this up over the Easter period and will post some pictures then.

Sunday 16 March 2014

Bamboo Limbs

I've taken a gamble and ordered some Recurve Bamboo Limbs from Custom Built Archery. Will certainly be writing up about these when I receive them as there doesn't seem to be many reviews around.

Update: No bamboo limbs for me, they are out of stock, so I've gone for SF Fibre Foam instead, I'll write up how I get on with them. At the moment though, I've pulled my shoulder so I'm having a bit of trouble pulling them through my clicker. Might have to drop them down to 28 lb as my bow is maxed out.

It's quite interesting that under a year ago I was pulling 18lb's and now I'm on 30lb's - I'll probably stop at these and see how I get on with the longer distances in the Summer.

I suppose I could still order the Bamboo ones and use them for Field Archery, hmm watch this space ...

Fairbow at Stratford Archery Club

Fairbow Archery Show
What a disappointment!  Visited the Fairbow show on Saturday and it was a dead loss.  The arrow making was interesting and the guy was really friendly and knowledgeable, but there was only one stall selling gear.  It certainly wasn't anything like the picture on the right.

Was also expecting to shoot for free as advertised and it turned out to be £19.00 per session and we were told to come back at 2.00 as the morning session had started and the second session was full.

Watched as some other people left too.  One woman who was contemplating buying a bow was told that after 3 arrows she couldn't shoot any more unless she paid another £9.00 for 3 arrows.

Another fellow archer from my club had a totally different experience and shot for free from 12.00 until 4.00, tried out different bows and had a great day - that's what I was expecting.  What a let down and I'm so sorry for my brother-in-law and wife who travelled from Wales for this event.  We all left feeling quite fed up.  It could have been amazing if there were more stands there and we actually got to shoot.

Thursday 6 February 2014

Quantum Archers CWAA Indoor Championships 2014

In a previous post, I mentioned about bow tuning and what a difference it has made.  Here are my very bad scores to date and then my new score at the "Portsmouth" Indoor Championships!

386, 389, 400, 428 - then I tuned my bow - 340 and then I took the shelf off my finger tab, replaced the brass nocks on my string (which had ripped my chin to shreds) and put on some glasses that don't slip down my nose. Last Sunday I got 470- well I have only been shooting for 6 months! I won the women's recurve handicap, even though I don't understand anything about handicaps. Will have to look that one up.  Happy times … wonder if I get something for that.

Been told that my handicap adjusted score is 1512???

Monday 27 January 2014

Bow Tuning for Beginners

This isn't going to be a lengthy post as there is so much information on the Internet, instead, I'm posting some really useful links for bow tuning. I can't believe how much of a difference this had made to my shooting.

From the Coach's Manual at World Archery GB - this is definitely useful!
http://www.worldarchery.org/UserFiles/Document/FITA%20website/07%20Publications/02_downloads/Coaches_Manual_Lev2/11_Recurve_Equipment.pdf

Merlin Archery Part 1 Review - shows adjusting Tiller and Brace Height etc.
http://www.youtube.com/watch?v=kGxI1KkA_Mw

Merlin Archery Part 2 - Twisting bow string, upping the poundage on your bow.
http://www.youtube.com/watch?v=M4ana2Mn9Us

As I hadn't done any bow tuning at all, I did all of it in one go, starting with brace height, shooting bare shaft arrows and adjusting the plunger.  All seems good at the moment, so just going to shoot and then review once I know a bit more.

Ps. I've now pushed my bow to 26 lbs (don't laugh!) and re-checked all my tuning - life is sweet.

Creating a Target Stand

As my kitchen is a little small for shooting, occasionally we get to shoot in a warehouse. I'm not very good at making things, but my partner is pretty good so he made us a stand for our new bosses. The hard foam targets are sooo much better. We bought 2 and put one behind the other.

3 pieces of wood
Saw off 2 pieces at an angle

This is the top of the stand
Saw off 2 of the pieces at an angle to sit on the floor
the other piece needs to be cut off also and will be for the back
It should look like this
Mark out where you want the bottom of your boss to sit
Drill and screw 2 pieces to the outside front legs
Screw the tops together
Drill holes and thread rope through to strengthen
Target Stand Up and Ready

Basic Guide to Arrow Fletching

I think I must be doing something wrong as my fletchings just keep coming off. It's either me, or the arrows are not clearing the arrow rest. I did a 5 hour session in a cold warehouse and ended up with a handful coming off. Anyway, here is a beginner's guide to replacing fletchings with a fletching jig.

Basic Setup
First you need to clean off your arrow, so remove any glue with a penknife and then clean off the arrow with acetone or alcohol etc.

Set up your fletching jig and measure the distance from the notch. Mine is 1.1cm to the bottom of the remaining fletchings. I also marked my jig with a "Sharpie" so that I always start with the cock feather.


Put the nock into the jig at the bottom.
Put the cock feather in the big
magnetic clip, with the big end
nearest the "1".
Cock Feather

Glue along the edge with proper fletching glue and put the cap back on the glue - quick.
Put the big clip back onto the jig and push it onto the arrow shaft.
Leave it for a while and then remove the big clip carefully. Turn the knob at the bottom ready for the next one.

I hope this helps other "newbies" like myself.

Last Fletching


Ps.  I've since found out that if you think you have clearance problems you can dust your arrows with spray talc to see if it comes off after you've shot your arrows and you can move the nock point slightly round to rectify this.